
Learning To Work More Efficiently!
Anybody who spends more than a day in a session or days editing audio knows that the more efficiently you work, the better your flow and focus on what you’re doing is. That is why the pros will never click or search a menu for something they can quickly do with the strike of a couple keys. So Mix Studios is bringing you 5 Useful Shortcuts in Pro Tools for you to add to your work flow.
First let’s approach an issue involving shortcuts that causes more frustration with new Pro Tools users than they realize. It all begins with questions like:
- “How did I enable ____?!”
- “How did I fall into ____ mode?!”
Shortcuts, Key Commands, And The Difference
To explain this let’s first make a distinction between Shortcuts and Key Commands. This seems kind of silly but hear me out.
Key commands
Key Commands have two traits
- First; they are a single key on your keyboard, usually a letter, that has a function in your edit window.
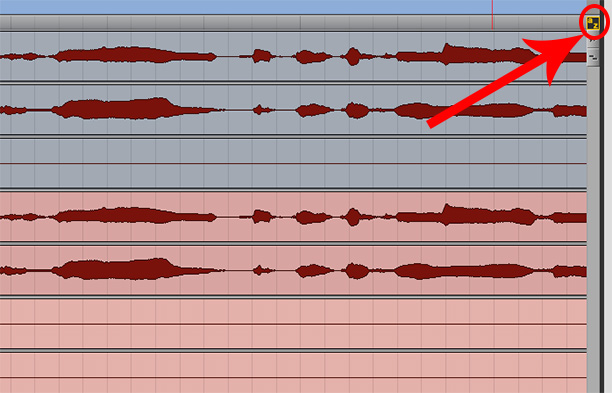
- Second; they are enabled and disabled by the little ‘A Z’ symbol at the top right corner of your edit window.
Shortcuts
Shortcuts are combinations of Special Keys AND a letter or character on your keyboard that may also be used for a Key Command. Shortcuts are not disabled by the ‘A Z’ symbol in your edit window.
Special Keys are:
- Shift
- Control
- Option
- Command
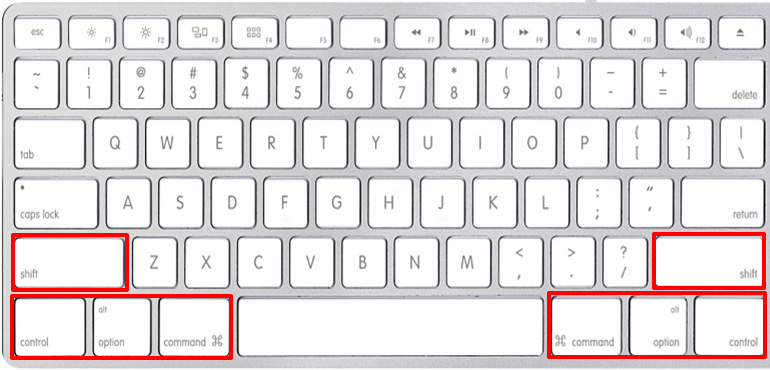
**Special Keys do nothing when pressed by themselves. The just expand the functionality of the rest of your keyboard.**
So why does this matter for this tutorial?
Well, a lot of the time we approach Shortcuts backwards and accidentally enable something with a Key Command. Let me frame the most common scenario for you:
- You’re working in your edit window and playing the same part over and over again trying to get something to sound right.
- Your insertion marker is at the beat you want it at so you can hear the same two bars whenever you hit play.
- Now, maybe you create a new track or auxiliary and use the Shortcut “Shift + Command + N”
- You don’t realize you hit N before the other two keys.
- It didn’t create the track but you just went ahead and pressed the Shortcut again, and it worked.
- You didn’t think anything of it.
With your new track made, you hit spacebar and the insertion keeps staying where the audio is when you stop. It isn’t going back to where you had it anymore! Whether you quickly knew the solution or had to scratch your head for 5 minutes, this has almost certainly bothered you at one point. You enabled “Insertion Follows Playback” by accident because its Key Command ‘N’ enables and disables it.
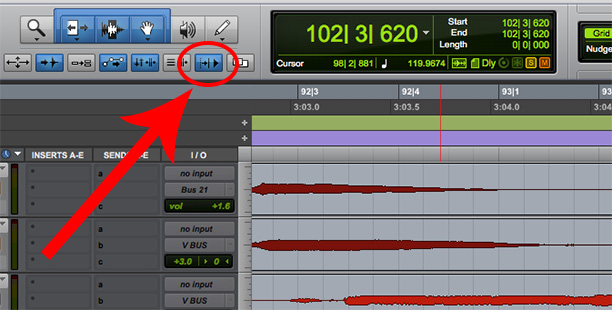
Insertion Follows Playback activated
So what have we learned here?
Make a habit of pressing the shift/control/option/command portion of your shortcut first so that you don’t accidentally hit a Key Command; that might throw off your work flow. We will refer to both as shortcuts in this tutorial. Just remember: special keys first. Let’s get started!
Shortcut #1: Disable Track Inserts
SHIFT + A
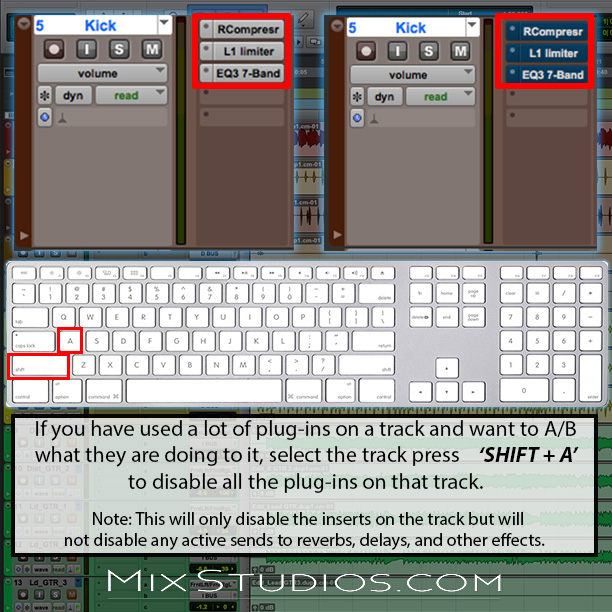
Starting off is a tip I’ve noticed a lot of people don’t know, so we wanted it in the first installment of 5 Shortcuts. Sometimes we get really into adding plug-ins to a kick or other tracks we obsess over. That’s fine, but we might want to hear how it sounds to the original to assure ourselves it is getting better. Luckily we have a cool trick for bypassing all of the inserts at once. Select the track and toggle back and forth by PRESSING SHIFT + A.
More tips and shortcuts on Instagram! Follow @mixstudiosonline to keep up with tips, and hear about deals and coupons!
One or Many?
You may have thought that comparing one track with its original was helpful, but how about multiple?!
Lets say you would like to disable the inserts on your kick, snare, and bass. Select the first track, then while holding command, select each track you wish to use the shortcut on. They do not have to be next to each other; this is why we are holding command. Once all the tracks you want to compare are selected, press the shortcut and there you go.
A couple things that should be considered…
- This shortcut will only disable the inserts on the tracks. Any sends to reverbs, delays, and FX will remain active on the track.
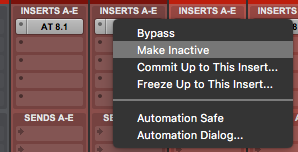
- If you use this on a track with bypassed plug-ins, it will un-bypass them when you press the inserts back on. If you are sure you don’t want plug-ins working but don’t want to remove it, make it inactive by RIGHT CLICKING the plug-in and selecting MAKE INACTIVE.
- If you have a plug-in that is bypassed by automation, it will come online when you bring inserts back on for the remainder of that playback.
Shortcut #2: Split Regions AKA “Separate Clip”
Press B
Next up and used by lots of people doing audio editing is splitting up regions. This is a basic that all new users should know and pros should use without thinking. There are two useful ways to use this.
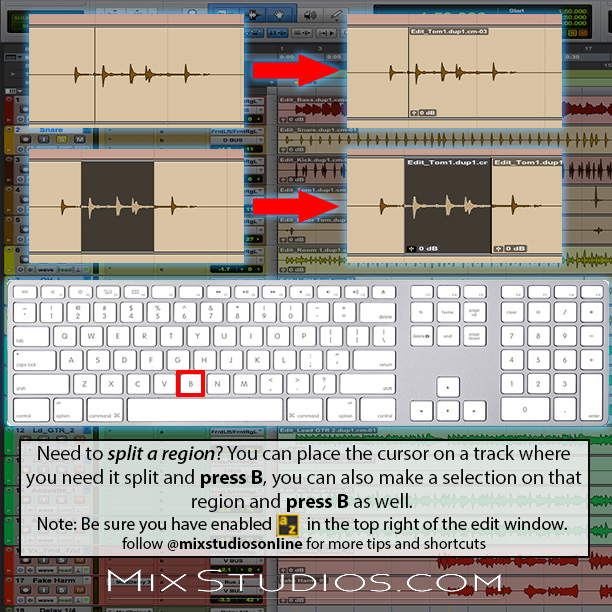
- First, if you just need to divide a region in two, place the insertion where you need it using the Selector tool (F7) and PRESS B. You can do this across multiple tracks at the same time.
- Second, if you need to make an individual region out of a selection, make your selection across one or more tracks using the selector tool (F7) and PRESS B
More tips and shortcuts on Instagram! Follow @mixstudiosonline to keep up with tips, and hear about deals and coupons!
Is it not working?
There is a chance you are trying this one and it isn’t doing anything. As we mentioned earlier about Key Commands and Shortcuts, this single key would be a Key Command. If it isn’t working, make sure you have Key Commands enabled by pressing the ‘A Z’ icon in the top right-hand corner of your edit window.
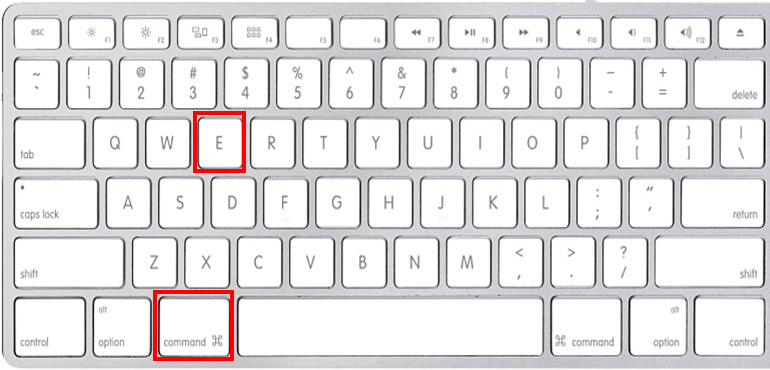
“But I don’t like working with Key Commands enabled.”
Maybe you don’t do a lot of ongoing editing in your work load and keep Key Commands disabled to prevent errors in your flow. Well if you need to split a region without Key Commands enabled, you can also use the shortcut COMMAND + E. As we mentioned earlier, shortcuts don’t disable with the “A Z” button.
Shortcut #3: Task Manager
Option and ‘
Now if you’re thinking a quick way to bring your Task Manager up and put it away isn’t useful you just haven’t thought about how you’re spending your time.
“How Does Task Manager Help Me Manage My Time?”
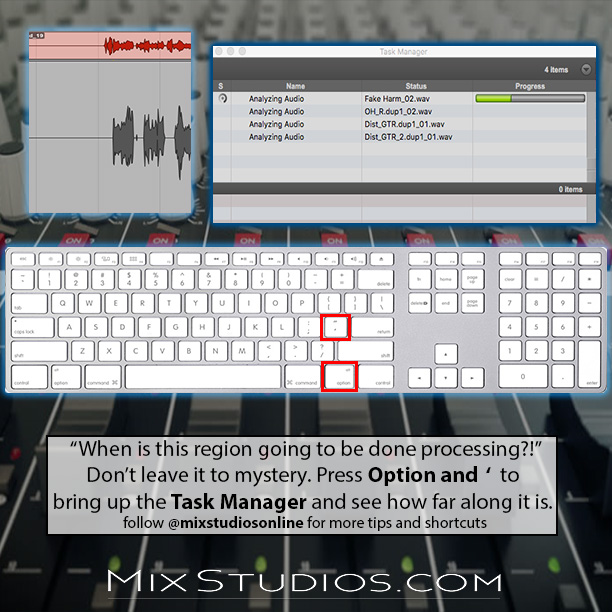
Well, the truth is we might process multiple audio parts with audiosuite and ideally we would want ‘hearing them processed’ to be the next thing we do. But what about when you think it’ll be done any second but little do you know it’s moving slow enough to take a few minutes? You then spend a few minutes staring at the screen telling yourself “Any second now” the whole time.. because you still think the next thing you have to do is hear that processed audio.
Take A Quick Look
Go ahead and press OPTION and ‘ on your keyboard. Your task manager will pop right up. Pressing the keys again will put it away. Now if you are waiting on a file you could see if it is processing fast enough to wait on it. If it seems like it all could take a few minutes, you know you can kill some time adjusting fades or removing noise from vocals. Just always make the most of your time- especially when editing.
More tips and shortcuts on Instagram! Follow @mixstudiosonline to keep up with tips, and hear about deals and coupons!
Shortcut #4: Multi-Tool Shortcut
F7 + F8
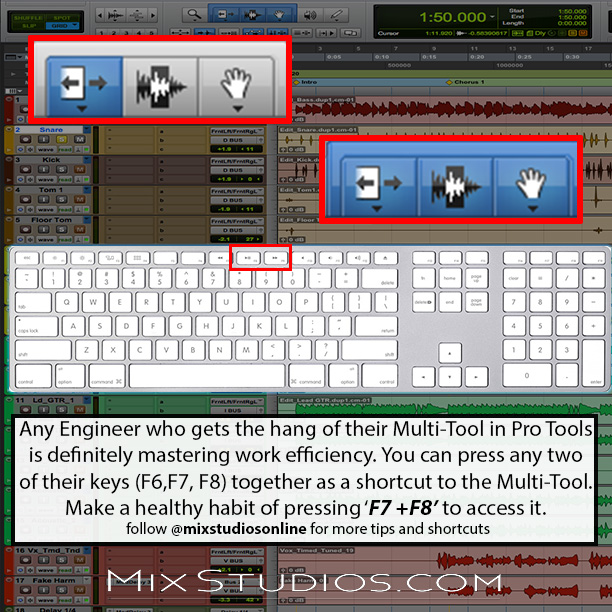
Don’t you love it when you don’t have to pick a favorite because you can have it both ways? Pro Tool’s Multi-tool goes a few steps further and lets you have it five ways. Three of the five can be activated individually by pressing F6, F7, or F8. When you press any two of those three at the same time, you will activate the DAW’s Multi-tool. This is very powerful once you get the hang of it and we’re going to go over how to use it.
“So Why Are You Saying F7 + F8?”
Good question. I’ll answer after mentioning it is a preference I find useful, but you can choose any of the two you prefer. I find that only two of them commonly might need to be used alone; the Selector Tool and the Grabber tool. So I made a habit of pressing F7 with my left middle finger making it easy to find the grabber tool (F8) with my left index and easy to active the Multi-tool with the same motion. So training my left middle finger to that F7 key helped me get quicker with three tool selections at once. This might work for you, but of course do what feels right for you on this.
Using the Multi-tool
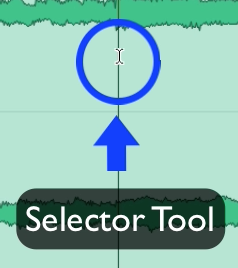
- Using the Selector: Float the tool over the upper half of the region and you will notice the ‘I’ appear for you to insert the cursor or make a selection.
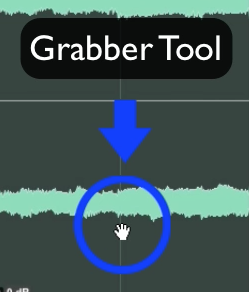
- Using the Grabber: Float the tool over the lower half of any region and you will notice the ‘Grabber Hand’ will appear. You can now use it to select a whole region or grab it to slide around or move it to another location or track.
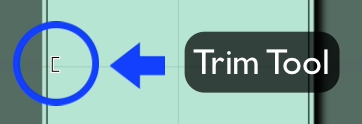
- Using the Trim Tool: If you float the tool over the beginning or end of a region, you will notice the [ and ] appear. When this appears you can click and hold to adjust where the region will end. You can make it shorter or bring it back out if it has already been trimmed and isn’t committed.
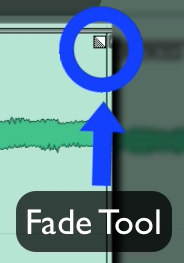
- Using the Fade Tool: If you float the tool over the top left or top right corner of any region, you will notice a fade symbol appear. You can click and hole to pull a fade off the corner and into the region. Cool note: if the region has trim not visible, you can trim outward away from the region as well.
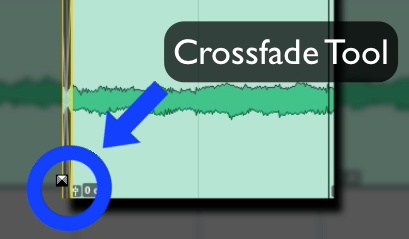
- Using the CrossFade Tool: If you float the tool over the bottom left or right corner of any region you will notice a cross-fade symbol appear. You can click and hold, then drag into either adjacent region and it will create a cross-fade.
More tips and shortcuts on Instagram! Follow @mixstudiosonline to keep up with tips, and hear about deals and coupons!
Shortcut #5: Consolidate Regions
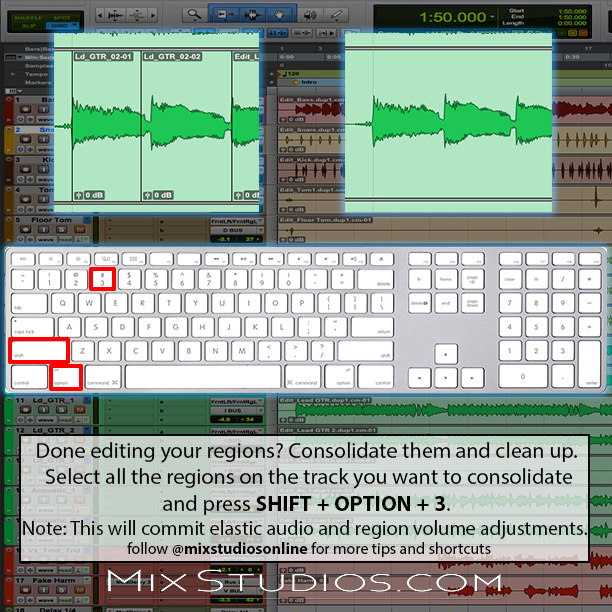
SHIFT + Option + 3
And last but not least is a very useful feature for people of all skill levels is knowing how to quickly consolidate regions in a track or multiple tracks. You may find this necessary for different reasons but let me point out some obvious and some a less bit obvious.
Cleaning up a session after editing
Lets say you’ve been cutting up a region trying to make it work dynamically adjusting its volumes, inserting crossfades to remove a noise, or just removing room noise from a vocal track. When it’s all edited the way you want it, you’re more than likely going to want to treat them all the same. They’ll move together, get trimmed together, etc. Well consolidate them and you merge the treatment of those regions once again but now with your edits.
“What if I don’t need to move anything and don’t mind looking at all the regions?”
First off, I don’t recommend this. Some reasons include but are not limited to:
- When zooming out of some tracks it can be tougher to notice visual transient issues
- It becomes easier to accidentally slide a snare or piece of audio without realizing it until it steps up in your mix
- It will be difficult to use the multitool for selections when the regions are small enough to constantly bring up the fade tool
“Well is there anything I should keep in mind when consolidating regions in Pro Tools?”
Absolutely. I would say first and foremost, understand what you are getting yourself into. Consolidating a region is like committing JUST the region of a track. So a few things will happen to the region:
- Fades & crossfades from before the consolidation can no longer be adjusted.
- You are creating a new region to replace all the others, so you won’t be able to trim out a portion to bring old audio back in that way.
- Any edits in elastic audio will be committed to the region.
- All the individual volume trims in the bottom left of each region will be committed to the new region and set to 0db for the new one
- Muted regions will be committed as silence
So an important thing to keep in mind is that you should be sure none of these things are going to effect your work negatively before consolidating. Make being aware of the impacts second nature so you always know when consolidating is right.
More tips and shortcuts on Instagram! Follow @mixstudiosonline to keep up with tips, and hear about deals and coupons!
Finishing your editing process
Let’s say you’re done editing your session but have made a million regions- some used, some not- and have a lot of clutter in your edit window.
You can clean the clutter and downsize your session to send for mixing with a few easy steps using this shortcut as part of the process. I recommend to Save Copy In and do this to a copy of the session and leave your previous one as a backup for any unnoticed editing that needs to be undone. This is important. We go over Save Copy In in our tutorial on Exporting Sessions In Pro Tools HERE.
Once in the copy of the session you want to downsize and your regions are consolidated, follow the steps in our How To Reduce The Size Of Your Session For Transfer tutorial.
There you have it!
Those are MixStudios.com’s 5 shortcut tips for January. Hopefully you learned something new or got a refresher on something you almost left behind.
Follow us on Instagram @mixstudiosonline to get more tips and tricks to your phone regularly!