There are some things that should just be known by everybody working a session in Pro Tools, click tracks and tempo setup are definitely a couple of them. Tempo is sort of the skeleton of your song. The tempo of your music being entered into Pro Tools allows it to apply the grid to your project. We all know how handy that grid is when moving parts of your production around to explore ideas or correcting timing errors in your favorite take. Because it is so important and such a fundamental part of working a session, don’t be caught in a studio that uses Pro Tools not knowing these things.
First, lets go over how to put a click track in your session.
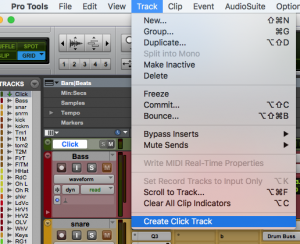
The roundabout way of doing it is to make an instrument track and add a click to the inserts. But you can just click the Track menu then at the bottom select ‘Create Click Track.’
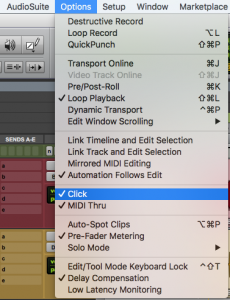
Once you have the click tract in your session, hit play to listen for the click. There are times that you may put a click track in a session and then don’t hear it. If you see the click track but do not hear it, go to the Options Menu and make sure Click is checked. You can also just make sure the Metronome icon is blue in the session’s transport.
Or
Why would they put that there?
Sometimes a session can reach almost or even over a hundred tracks and then more Aux and MIDI Tracks. If your click is lost amongst the tracks and you need it muted, you can just click Option and uncheck the Click or hit the metronome in the transport, both are easier than searching.
Now that we have the click in the session and you know how to play it and mute it, lets get it to match the tempo of your song.
There are a couple options you have when it comes to setting the tempo of the song.
First, if you know the tempo of the song and it is the same the whole time, you can do the following:
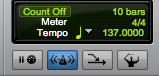
- Make sure conductor mode is turned off in your transport. Conductor mode can be toggled by pressing the icon of a conductor waving his baton. It’s the to the right below the tempo.
- After that, you will be able to edit the tempo of the session right in the transport. Just select it and enter the new numbers in.

Second, if you DO NOT know the tempo of the song and it is the same the whole time, you can do the following:
- Make sure conductor mode is is turned off in your transport.
- Highlight the tempo in the transport and hit spacebar.
- After hitting spacebar the song will begin playing. When the song is playing just tap the T on your keyboard gently to the tempo of the music.
Try to remember that the keyboard is not a drum pad; especially if it isn’t yours. As you tap, you will see the tempo change and after a measure or two of you being consistent, work with what you have come up with. From here you can bring that number up or down a beat if it sounds like it might be slightly too fast or slow.
And finally, if you DO NOT know the tempo of the song and it has multiple tempos throughout, you can do the following.
- Make sure the Conductor Mode button is selected in your transport. What this does is allows you to do is have multiple tempos in your song.

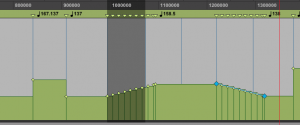
- Look in the upper left of the window and notice the tempo drop down; click it.
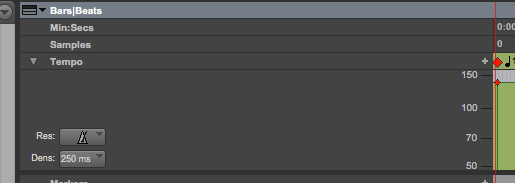
- Now you can see a section that shows input for tempo automation. Find the area of this section that shows you where the tempo is at. This will be when you notice the horizontal line with green below and grey above.

- Now select the measures of the song you would like to change the tempo of.
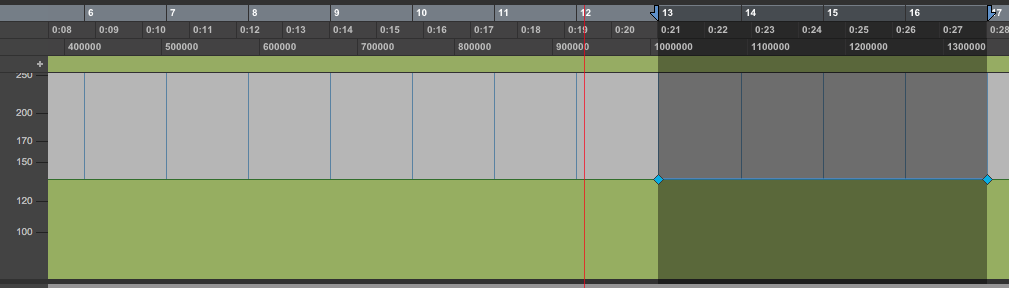
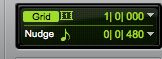
- This may be easier if you make sure the grid mode is set to a full bar.
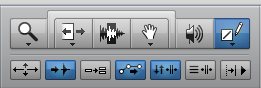
- Next make sure you are using the selection tool or have the three main tools selected together

- Now when you float the tool over the gray area of your selection, it will turn into a downward bracket. You can click and hold to increase or decrease the tempo of the selected measures.
What if you don’t want the tempo to change suddenly?
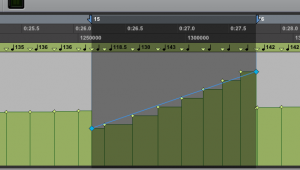
- If you want to have a measure or measures serve as a gradual transition to the new tempo, you will first need to select the pencil tool
- Then in the tempo area of the edit window, draw a line going from the beginning of the transition measure(s) to the new tempo.

- You should then see the tempo curve and the metronome will follow that.
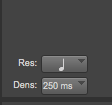
Don’t be surprised when the session grid stretches out. The same amount of measures at a slower tempo is more time, so it is adjusting size accordingly. One thing to check for if you have something funny going on is that the resolution is correct before making tempo edits. You are likely going to want this set to a 1/4 note.
There you have it. You should be able to use these tips to help setup click tracks and grids in Pro Tools. With this you’ll be able to get the timing of your project much more dialed in. If you enjoyed this tutorial, you may want to check out our tutorial on Auto Session Backup.